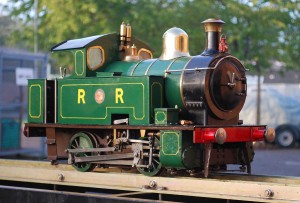
As a member of the Buxton Model Engineering Society, I have accompanied other members on visits to the Sheffield & District Society of Model and Experimental Engineers (SMEE) miniature railway at Abbeydale where we are invited annually for private “running” days. It’s always fascinating to see the engines that others have built as well as ride on them and occasionally drive them. A couple of years ago, I decided I should build my own scale locomotive…
There are plans available for many different locomotives that have been developed over the years therefore it took me some considerable time to decide which one I wanted to build. I wanted to build something that I could ride behind so that meant a minimum of 3 1/2″ guage. Reading around the subject led me to understand that it should be easier for a first time builder to build a larger gauge engine since there are fewer fiddly parts however there is a compromise in that the larger scale engines are heavier and require larger workshop machinery. I therefore focused on 5″ guage loco plans and was initially drawn towards the Simplex however I was advised that the Super Simplex was an improvement to the design to provide more power and stability.
I started by finding the details of the magazine back issues that I’d need and got hold of some to begin reading however I was not grabbed with a burning desire to build the model and nothing much happened. Some time later, I was asking questions on the Model Engineer forum and was told that the name Simplex was a bit of a misnomer because it was not in fact that simple to build. My alternative idea at that time was to build a SweatPea however Julian Atkins on the Model Engineer forums asked whether I’d considered the Railmotor, designed by Don Young. I had not so when I searched for and found some pictures of it, I realised it looks very handsome and that I’d found the engine that I wanted to build 🙂 Specifically, I wanted to built the Railmotor No.3 which is a combination of the best bits of Railmotor No.1 and No.2 with an extended rear frame to lengthen the cab to look more realistic.

I asked for and received a set of plans as a Christmas present and my intention is to construct the model virtually in 3D CAD to ensure that the plans do not contain any mistakes. I have now finally made a start on the frames and the image below shows the frames with stretchers in place.

More to come soon 🙂