I started off using a Brupaks mash tun/boiler to mash in however it was always difficult to maintain a steady temperature during the mash and needed quite a bit of fiddling with to keep the temperature correct for the period of the mash.
I spotted a mash tun made from a drinks coolbox in Hop&Grape and then come across some websites showing details of how to modify a coolbox yourself so I thought I would give it a go…
I bought a cheap coolbox from Wilkinsons for £6.99 and had a spare tap from a King-Keg. The inner and outer skins of the coolbox were clipped together at the top which made it east to fit the tap; I removed the inner skin and cut a hole with a sharp knife for the tap close to the bottom. I then refitted the inner skin and used a felt pen to mark through the cut hole onto the outer skin so I could cut the hole in the right place. NB: you have to cut a larger diameter hole in the outer skin to allow the tap body to pass through. Once the holes were cut, I reassembled the inner and outer skins and then fitted the tap. The photo below shoes the finished thing:

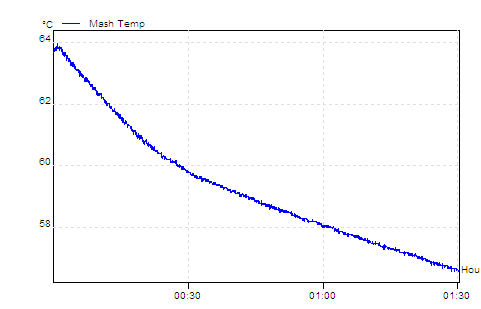
I decided to test the thermal performance so I half filled the box with water at 64C, put the lid on and monitored the temperature for 90 mins. The graph below shows that the temperature dropped by 7C over 90 mins which would be far too much drop during a mash.
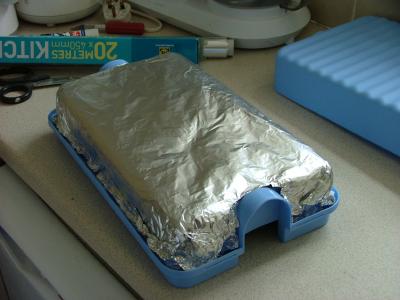
The outer skin of the box felt warm to the touch and the lid was even warmer therefore it seemed obvious that I needed to increase the amount of insulation to try and reduce the heat loss. A thin sheet of polystyrene was the only insulation in the space between the inner and outer skins which did not seem to be adequate. I therefore dismantled the coolbox again and covered the inner skin with a layer of aluminium foil. I then covered the foil with two layers of bubble-wrap. Finally I lined the inside of the outer skin with aluminium foil before reassembling the whole thing complete with the original sheets of polystyrene. The photo below shoes the same thing being done to the lid which also separates into two pieces:
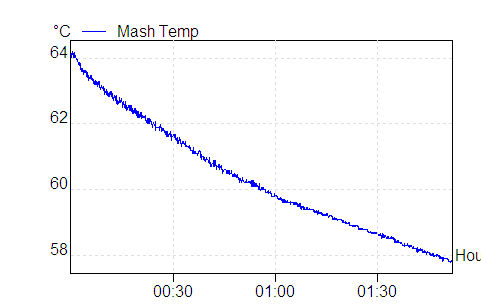
To see if I had made any improvement I repeated the above temperature test. The temperature drop was reduced to 5C over the 90 mins which is an improvement however I expected it to be better than that. The outside of the box certainly did not feel warm the second time. See graph below:
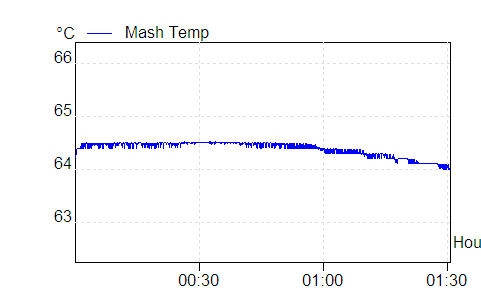
Oh well, worry ye not. From discussions on The Home Brew Forum the grain in the mash tun makes a big difference to the thermal performance. My next mash gave me the chance to try out the theory. I was truly surprised by what I found! The graph below shows only around 0.6C drop in temperature during the 90 min mash:
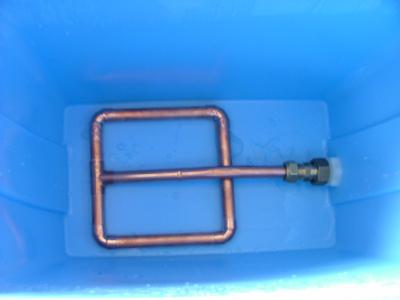
The final photo below shows the grain bed filter fitted to the mash tun. The filter is made from short lengths of 15mm copper pipe used for household plumbing. None of the joints are soldered as they don’t need to be. Slots have been cut into the copper tubing underneath to allow the wort to drain. A simple 3/4″ to 15mm tap connector is used to attach the strainer/filter to the back of the mash tun tap.
And that’s it. Go on, make your own one! 🙂
Hi there,
Did I get this right: When grain is added to the water, it significantly improves the waters ability to hold a steady temperature? I ran a test with my [url=https://fbcdn-sphotos-a-a.akamaihd.net/hphotos-ak-prn2/t1/1185978_10151962490556659_1171079322_n.jpg]insulated 10 litres kettle[/url]. The starting temperature for 6 litres of water was 65 C, and one hour later it had dropped to 60 C. For a mash to be successful, I guess this drop in temperature would be too much. But if I got this right, my mash kettle should hold the temperature good enough, when grain is added to the water.
best,
Axel
Helsinki, Finland
p.s. It was really hard to find any information on this on the internet, so thank you for this post.
Hi Axel,
Glad to know it is useful. Yes, there seems to be a big difference in how well it works when comparing water on it’s own to a proper mash. I am pretty convinced you will find your mash kettle should hold temperature well once you try it with a proper mash 🙂
All the best and let me know if I can help in future.
Martin
Hi Martin,
Thank you for your quick reply! And sorry for the invalid html-tag, I was trying to link to a picture of the kettle. I think I’ll still try to improve the insulation with some aluminium foil between the two layers of camping matress. But I’m now confident that the mash will be fine. This is my first proper mash, after doing a couple of extract beers, and I can’t wait til I get the grains next week 🙂
best,
Axel
No problem, I found your image ok and it looks good. The foil would definitely help even further. Good luck with your first mash, expect things to go wrong and don’t panic when they do 🙂 the process is much more forgiving that you might expect. Have fun!
Martin